1. Select Menu Future Strategies
-
Choose Future (to create a campaign on a real account) or DEMO (to create a campaign on a demo account).
2. Select Configure Yourself
-
After clicking Configure Yourself, the screen will switch to the strategy settings table where you can customize parameters according to your needs.
Part 1: Configure Campaign Parameters
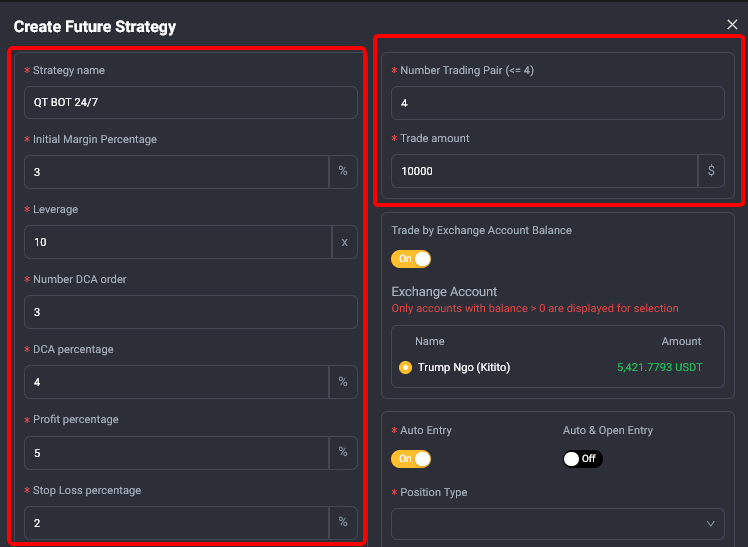
1.1. Create Strategy Name:
-
Instructions: Enter a name for your trading strategy. This is a unique name that you assign to easily identify and manage different strategies.
1.2. Margin (%):
-
Instructions: Enter the margin percentage you want to set for your strategy. This percentage is calculated based on your total capital for a currency pair.
-
Example: If you have $6000 and want to trade 6 currency pairs, each pair will take up $1000. With a 3% margin, the amount used for each pair will be $30.
1.3. Leverage:
-
Instructions: Enter the leverage ratio you want to use in the strategy. Leverage increases potential profits but also comes with higher risks.
1.4. Number of DCA Orders:
-
Instructions: Enter the number of DCA (Dollar Cost Averaging) orders you want to set up for your strategy. The number of DCA orders is calculated based on the capital allocation ratio and the number of currency pairs you want to trade.
1.5. % DCA Interval:
-
Instructions: Enter the percentage interval between DCA orders. This is the distance between DCA orders, expressed as a percentage.
1.6. % Profit:
-
Instructions: Enter the profit percentage at which you want the BOT to close a trade.
1.7. % Stop Loss:
-
Instructions: Enter the stop loss percentage to manage risk for each trade.
1.8. Total Number of Currency Pairs to Trade:
-
Instructions: Enter the total number of currency pairs you want to trade in this strategy. The system supports a maximum of 6 pairs simultaneously.
1.9. Total Investment Amount:
-
Instructions: Enter the total amount you want to invest in the strategy. This amount will be equally divided among the selected currency pairs.
1.10. Trade by Exchange Account Balance:
-
Note: If you select this option, QT BOT will automatically use the balance in your exchange account as the base capital for each trade (this will be automatically updated for each trade).
Part 2: Order Execution Techniques

2.1. Order Execution Mechanism: Two Options
-
Auto Entry:
-
Description: The trading strategy will automatically select currency pairs based on the results of the AI Bot's scan of hundreds of pairs on the exchange to identify those that meet the criteria. You do not need to manually select the currency pairs.
-
Auto & Open Entry:
-
Description: If you prefer the AI Bot to trade only specific pairs that you designate, you can manually select your preferred currency pairs for trading.
-
How it works: The pairs you choose will be traded according to preset formulas in Bot IKH, Bot SMC, and BB.
-
Key difference: In addition to the automatic entry by QT BOT based on algorithms, with the Open Entry feature, you can manually place additional trades along with the BOT. This is useful if you see a good opportunity in the market while monitoring the BOT's operations. The BOT will take over and manage the trades you place.
-
Instructions: Refer to the Open Position guide for more details.
2.2. Position Type:
-
Instructions: Specify the trading direction for the BOT. You can choose for the BOT to trade in one direction (up or down) or in both directions.
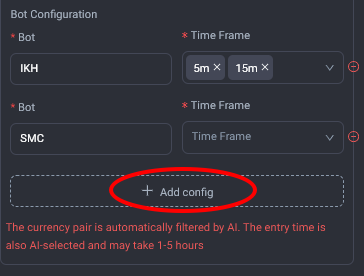
2.3. Set Up Available Formulas for the Strategy:
-
BOT IKH: Select to use the IKH formula for the strategy.
-
BOT SMC: Select to use the SMC formula for the strategy.
-
BOT BB: Select to use the BB formula for the strategy.
-
Position Type: Select the type of position, Long or Short.
-
Time Frame: Select the trading time frame, M5, M15, or M30.
-
Note: QT BOT is pre-integrated with optimized formulas. You can choose one or multiple formulas to run simultaneously for your strategy. For more information on each formula, refer to the Introduction to Trading Formulas on QT Bot.
Part 3: Finalize and Launch the Campaign
3.1. Save Campaign:
-
Instructions: Save the configurations and strategies you have set up.
3.2. Return to the Previous Screen, Click Start to Activate the Campaign:
-
Instructions: After saving, return to the previous screen and click Start to begin the trading campaign.
-
Note: To ensure the effectiveness of the campaign, carefully review the configured parameters before starting.