Setting up an advanced trading strategy on QT Bot allows traders to harness the full potential of automated trading by customizing various parameters to suit their specific goals and risk tolerance. By fine-tuning these settings, users can create a robust and responsive trading strategy tailored to dynamic market conditions.
1. Choosing Your Trading Account Type
Select “Menu Future Strategies.”
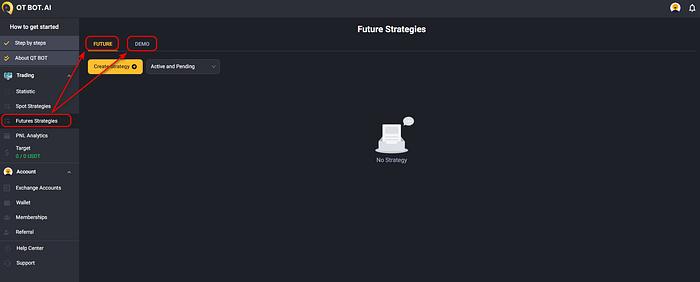
To begin, you need to choose between two account types: future (used for creating a campaign on a real account) or demo (used for creating a campaign on a demo account). This decision determines whether you want to test your strategy in a real environment or in a safe simulation.
Select Configure Yourself
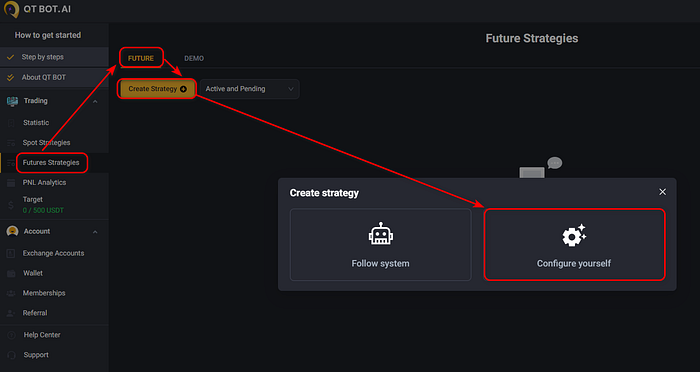
After clicking Configure Yourself, the screen will switch to the strategy settings table, where you can customize parameters according to your needs.
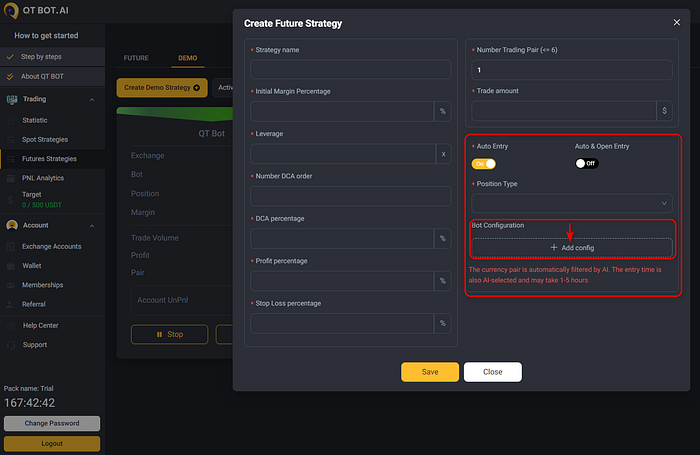
Part 1: Configure Campaign Parameters
Setting up your campaign parameters is a crucial step in creating a successful trading strategy on QT Bot. Below are the detailed instructions for configuring each parameter to align with your trading objectives and risk management preferences.
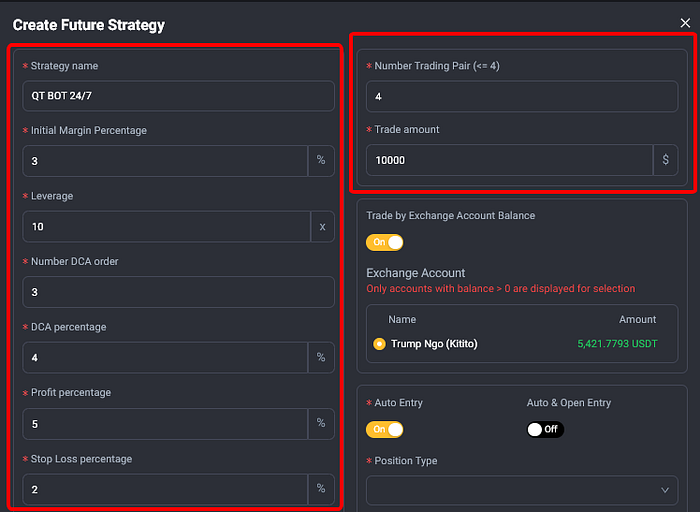
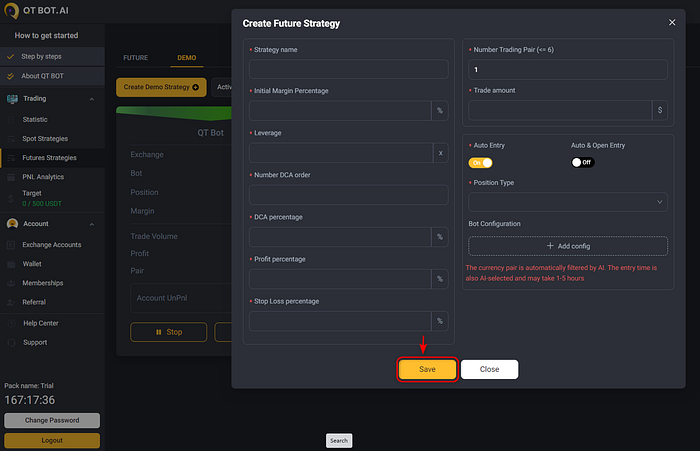
1.1. Create a Strategy Name
Begin by entering a unique name for your trading strategy. This name will help you easily identify and differentiate between various strategies you may set up in the future. A well-chosen name can make managing multiple strategies simpler and more organized.
1.2. Margin (%)
Input the margin percentage you want to allocate for this strategy. The margin is the amount of capital you are willing to allocate as collateral for trading a specific currency pair.
Example: If your total capital is $6,000 and you plan to trade 6 currency pairs, each pair would be allocated $1,000. With a margin of 3%, the actual margin used for each pair would be $30.
1.3. Leverage
Set the leverage ratio you wish to use. Leverage allows you to increase your exposure to the market without needing to commit the full amount of capital required for the trade. While leverage can amplify your profits, it also increases the potential for losses, so choose a leverage level that matches your risk tolerance.
1.4. Number of DCA Orders
Specify the number of DCA (dollar cost averaging) orders you want to implement in your strategy. DCA orders help you manage market volatility by spreading your capital investment over multiple orders at different price levels. The number of DCA orders should be determined based on how you want to allocate your capital across the selected currency pairs.
1.5. DCA Percentage Interval
Enter the percentage interval between each DCA order. This interval represents the price difference between consecutive DCA orders. Setting an appropriate interval can help you average out the cost of your trades, potentially leading to better overall pricing.
1.6. Profit Percentage
Define the profit percentage at which you want the BOT to automatically close a trade. This setting ensures that once your trade reaches a certain level of profitability, it will be closed to lock in gains.
1.7. Stop Loss Percentage
Set the stop-loss percentage to manage risk. A stop-loss order will automatically close a trade if it reaches a certain loss percentage, helping to protect your capital from significant losses.
1.8. Total Number of Currency Pairs to Trade
Indicate the total number of currency pairs you want to include in this strategy. The system can handle up to 6 currency pairs simultaneously, allowing you to diversify your trades across multiple markets.
1.9. Total Investment Amount
Input the total amount of capital you want to invest in this strategy. This amount will be evenly divided among the selected currency pairs, ensuring balanced exposure across your trades.
1.10. Trade by Exchange Account Balance
If you enable this option, the QT BOT will automatically use the available balance in your exchange account as the base capital for each trade. This balance will be updated automatically for each trade, providing a dynamic capital management approach that adjusts to your account’s current standing.
Part 2: Order Execution Techniques
In this section, we delve into the mechanisms by which your trading strategy executes orders on the QT Bot platform. Understanding these techniques will help you optimize your strategy for better performance in the market.
2.1. Order Execution Mechanism: Two Options
You have two primary options for executing orders with QT Bot: auto-entry and auto-open-entry. Each option offers a different level of automation and manual control, allowing you to choose the approach that best fits your trading style.
Auto Entry:
-
With Auto Entry, the trading strategy autonomously selects currency pairs based on the results of the AI Bot’s comprehensive scan of hundreds of pairs on the exchange. The AI Bot identifies those pairs that meet your pre-defined criteria, meaning you do not need to manually select the pairs. This option is ideal for traders who prefer a hands-off approach, relying on the AI to make informed decisions based on market data.
Auto & Open Entry:
-
If you prefer more control over your trades, Auto & Open Entry allows you to manually select specific currency pairs that you wish the AI Bot to trade. While the bot will still manage these trades according to the preset formulas (Bot IKH, Bot SMC, and BB), this option gives you the flexibility to influence which pairs are being traded.
-
How it works: The selected pairs are traded using the predefined formulas integrated within the Bot. This includes the IKH (Ichimoku Kinko Hyo), SMC (Smart Money Concepts), and BB (Bollinger Bands) formulas, which are designed to maximize trading efficiency and profitability.
-
Key difference: The main advantage of Auto & Open Entry is the ability to manually initiate additional trades alongside the automated ones. This can be particularly useful if you spot a market opportunity that the AI may not have prioritized. The BOT will manage these additional trades just like any other, allowing you to combine the precision of automation with the strategic insight of manual intervention.
-
Instructions: For more detailed guidance on manually placing trades, refer to the Open Position guide.
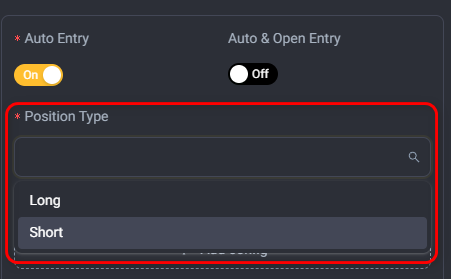
2.2. Position Type
In this step, you’ll specify the trading direction for the BOT. You have the option to set the BOT to trade in one direction—either long (up) or short (down)—or in both directions simultaneously.

-
Long Position: Choose this if you anticipate the value of the selected currency pairs to increase.
-
Short Position: Opt for this if you expect the value to decrease.
-
Both Directions: Select this option to allow the BOT to trade in both directions, capitalizing on market movements regardless of whether they are upward or downward.
2.3. Set Up Available Formulas for the Strategy
In this step, you will configure the specific trading formulas that QT Bot will use to execute your strategy. Each formula offers a different approach to market analysis and trade execution, allowing you to tailor your strategy to current market conditions and your personal trading style.
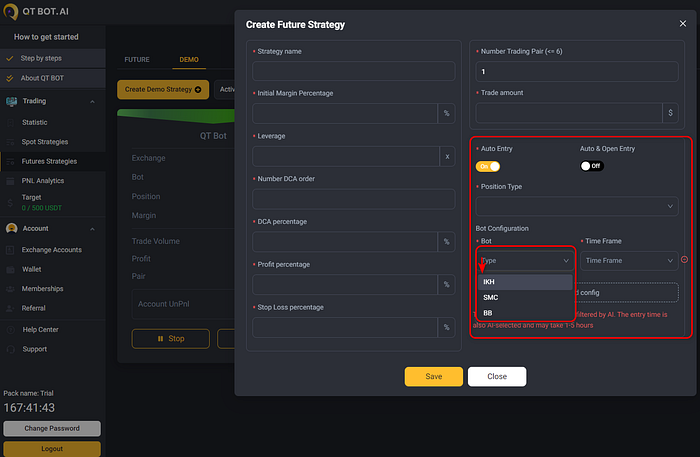
BOT IKH:
-
Select this option to utilize the Ichimoku Kinko Hyo (IKH) formula. The IKH formula is a comprehensive indicator that provides insights into support and resistance levels, trend direction, and momentum.
-
It is especially useful for identifying market trends and predicting potential reversals, making it a robust tool for trend-following strategies.
BOT SMC:
-
Description: Choose this option to apply the Smart Money Concepts (SMC) formula. The SMC formula focuses on analyzing market structure and price action, often tracking the movements of institutional traders.
-
This approach is particularly effective for traders who aim to align their strategies with the activities of large market participants, capturing significant market movements.
BOT BB:
-
Opt for this formula if you want to use Bollinger Bands (BB). The BB formula is designed to identify overbought and oversold conditions in the market, providing signals for potential entry and exit points.
-
Bollinger Bands are widely used in volatility-based strategies, helping traders take advantage of market fluctuations.
Position Type:
-
After selecting your preferred formulas, specify the position type for your trades. You can choose between long (anticipating that the price will rise) or short (anticipating that the price will fall) positions.
-
The choice of position type should align with your market outlook and the specific strategy you are implementing.
Time Frame:
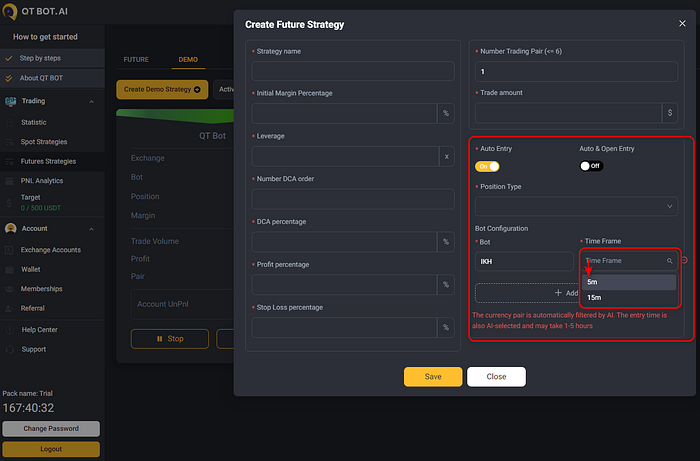
-
Set the trading time frame for your strategy. QT Bot offers multiple time frames to choose from, including M5 (5 minutes), M15 (15 minutes), or M30 (30 minutes).
-
The time frame determines how frequently the bot will analyze market data and execute trades, allowing you to adjust the strategy to your desired level of trading activity.
Note:
-
Important Consideration: QT BOT comes pre-integrated with these optimized formulas, allowing for seamless execution of complex trading strategies. You have the flexibility to select one or multiple formulas to run simultaneously, depending on your specific trading objectives and the market conditions you are targeting. For a more in-depth understanding of each formula and how they can be combined, refer to the Introduction to Trading Formulas on QT Bot.
Part 3: Finalize and Launch the Campaign
In this final phase, you will solidify your strategy by saving your configurations and then launching your trading campaign. This step is crucial to ensuring that all your settings are correctly implemented and that your strategy is ready to operate in the market.
3.1. Save Campaign
Once you have configured all the necessary parameters for your trading strategy, click on the Save button. This action will save all the settings and customizations you have made, ensuring that your strategy is stored in the system and ready for execution.
3.2. Return to the Previous screen and click “Start” to Activate the Campaign
After saving your strategy, navigate back to the previous screen. On this screen, you will find the Start button. Click this button to officially begin your trading campaign.
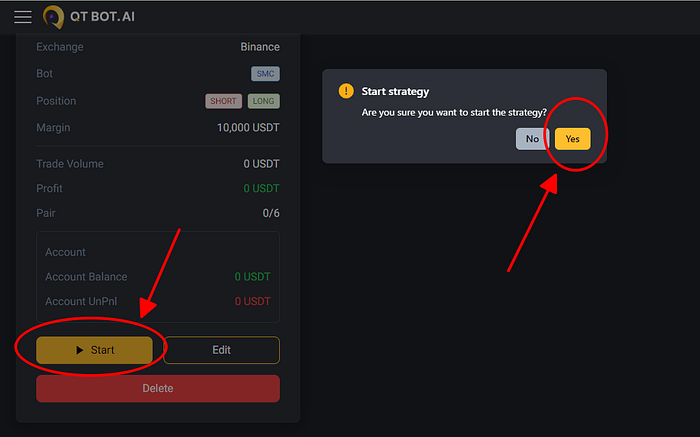
What Happens Next: Once you click “Start,” the QT Bot will begin executing your strategy according to the parameters and formulas you have set up. The bot will monitor the market, place trades, and manage your positions as per your configurations.
Final Check: Before clicking “Start,” it is advisable to carefully review all the parameters and settings you have configured. This final review helps ensure that everything is set up correctly and that your strategy aligns with your trading goals and risk management preferences. Taking a moment to double-check your work can prevent potential errors and improve the overall effectiveness of your campaign.
If you have any questions, feel free to leave a comment below! And don’t forget to clap and share if you found this article helpful.